Friday, May 31, 2013

"Re-doing" a Vintage Dress


I received this vintage dress for free, and I liked the fabric, even though I wasn't crazy about the style--especially the sleeves. I'm always cautious about modifying a vintage piece, (because I know it can be hard to put it back together) but I knew I would never wear it as it was. So I removed the sleeves, and stitched up the edges to finish them. 


I'm very happy with the results. Now it's something I'd wear! Some simple sewing was all it took to make it look like a whole new dress. 


Thursday, May 30, 2013

A New Quilt

I'm not really a "quilter" by most standards, in that I've never made anything more elaborate than squares pieced together. However, I enjoy having some simple sewing to do in the evenings. I take it slow, and it's very relaxing. There's no deadline or pressure to complete it (other than to get it off my floor!)

Below is the quilt I'm working on now. I end up having a lot of fabric scraps leftover from the diapers and pads I sell on Etsy, and I find that making baby quilts is a good way to put them to use. 


I sewed my first two rows tonight...


My mother put the pattern together, and I think it looks a little Western --almost like it's for a  future little cowgirl. What do you think?

Tuesday, May 21, 2013

Cloth Pads: How Does it Work?


If you'd like to begin using cloth pads, you might be wondering how it works. Are they hard to wash? How do you use them if you have to change them when you're out and about? Is it a lot of work? Is it icky?

The answers to some of these questions will depend on the kind of pads you buy (or sew). For the sake of example, I will speak from my experience with the type of pads I make for myself and for my Etsy store.

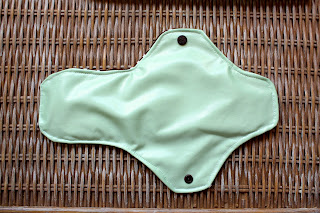
My cloth pads are very similar to disposable pads--in fact, I used a disposable pad as a template. They have a waterproof backing on one side and flannel side that sits up against your skin. The waterproof side is great for guarding against leaks, while the flannel side is very comfortable-- more so than the plastic in disposables.

 Flannel Side
Waterproof side

The pads I make also have snaps, which secure them in place when you're using them. This also allows them to be folded up (see below picture) into a convenient size for your purse.


Once your pads have been used, it is best to rinse them out immediately. Once they are rinsed out, you can either wash them right away or save up a few. A good place to keep them until you have a load ready is in a mesh bag in the shower or tub. 

Now, I realize that for some, this is where the ick factor comes in. Understandably  some people won't be able to get over this. We all have different "gross meters." I don't find rinsing them out to be an issue, and I'm sure many others wouldn't either--especially moms who already cloth diaper! Diapers are nothing compared to this in my opinion!

When you're ready to wash your pads, you will find that it is not complicated. They don't need a special detergent or special settings. At first, I worried that I'd need to wash them in a delicates bag, but I soon found they did better if I just tossed them into my washer with my normal colored loads.  Since they are a small item, they never make for "extra laundry." They are not like cloth diapers in this respect! The same goes for drying. Your normal settings are just fine.

But what if you work outside the home or spend a lot of time out and about? Can you still use cloth? Where do you put the pads until you get them home?

Yes, you can still use cloth--all you need to make this work is a wetbag. Wetbags are lined in waterproof material and are used to hold the pads until you get home. They come in cute fabrics and prints that won't look out of place in your purse. Below are some examples of wetbags I've sewn:


Once your pad is used, fold it mess side in, snap it shut and put it in the wetbag. When you get your pads home, you can rinse them out and treat them as you normally would. I have two wetbags: one small one that I put in my purse that holds two pads, and one larger wetbag that I use for longer trips, that holds around five or six pads. 

So how does the absorbency of cloth pads compare to disposables?  Cloth pads can be very absorbent without leaking, but only if they have a waterproof backing. I learned this through trial and error. I don't recommend pads that don't have PUL (polyurethane laminate) or another waterproof layer. I use about just as many cloth pads as I would disposables, but this will of course vary on which brand you were used to buying. All in all, I would say the absorbency is very similar. There won't be a huge disparity in how many you were using before compared with your new cloth pads. 

Finally, your cloth pads can last for a long time. I have the ones I sewed a year and a half ago, and they are by no means shabby. I am sure they will last at least four years if not much longer! One thing I would recommend if you are buying or making your own pads, is to buy a brown fabric. Over time, the pads will naturally become discolored and brownish. If you are one to care about the looks of things, going with brown will keep them looking new. 

I have tried to summarize some things I wondered about cloth before making the switch in this post, but I realize that I may have overlooked some questions or concerns. Feel free to ask away in the comments!


Monday, May 20, 2013

Cloth Pads: Why?


Lets be honest: disposable pads are easy. So why switch to cloth?

There are two reasons: saving money and saving the environment. I will be the first one to say that cloth pads are not for everyone, and unless you care about one of the aforementioned reasons, I'd be hard-pressed to convince you to switch.

For me, both reasons are enough to make using cloth worth the extra effort. Now, first understand that when I say "saving the environment" I don't mean it in a hug-a-tree-save-the-whales type way. I am not an environmentalist. I simply mean that when I think of all the plasticky disposable items covered in human waste that we pile into heaps, it disgusts me. I'm a frugal type person, who doesn't like to waste. I would never pile up that kind of waste in my backyard if I knew of a reusable alternative, so why keep contributing to it in a landfill?


The second reason, saving money, is also very important to me. I love seeing how I can free up money for other purposes--whether it's to give more away or to spend it on something where there really is no alternative or DIY solution. You know, something that I have to keep buying. 

For the sake of easy numbers, lets say you spend $10 a month on disposable pads. It doesn't seem like a lot, but in a year it adds up to $120. 

To get a stash of 20 pads (which is what I'd recommend to make it through a normal cycle), it would cost about $30 to sew them yourself. That would be a savings of $90 in the first year alone!


If you can't sew--buying a stash of 20 pads (anywhere from $70-100) is still well below what you'd spend in a year. 

However, that's only counting the first year's impact. Your reusable pads have the potential to last for many years if properly care for. Each year that you continue using your pads, you can pocket that $120!
I don't know about you, but that sounds good to me.


Now that we've examined the why of cloth pads, stay tuned for part 2 where I'll break down the how-- How do you make using cloth pads work?

Sunday, May 19, 2013

Using my Canned Apple Pie Filling


It's always fun to use the products you've canned for the first time. It's nerve-wracking at the same time. Did the seal stay? Are the contents okay? These are just a few of the worries of a novice canner, like myself.

Tonight I opened two jars of apple pie filling that I'd made in January to make apple turnovers. 

Cutting in the butter.

I haven't mastered pie crust yet, so I thought turnovers would be easier. I used a simple biscuit recipe from my Betty Crocker cookbook and added extra sugar to make for a sweeter dough. 


The seal on the jars were perfect and the contents looked good too. That's always a relief. 


The end result were huge golden brown delicious-tasting turnovers. 


 Yum!


Saturday, May 18, 2013

A Review of a New Recipe Book: Slow Cooker-Tonight!


I recently purchased Slow-Cooker Tonight!and it's quickly become one of my favorite recipe books. I love the convenience of using the slow cooker because I work during the day and it can be tough to find the energy to put together a nice meal after a long day of work. Using the slow cooker makes it easy for me to put together a meal in the morning when I have more time and energy. I've found that most of the recipes in this book take only 30 minutes to prepare in the morning, and are ready after a normal work day--8 or so hours.

Even if you don't work outside the home, it's nice to make a yummy meal earlier in the day and have it ready by dinnertime! My other favorite thing about using the slow cooker is the way it brings out the juices in meats and makes for a tender, flavorful meal. I've tried a couple of the recipes in this book and each has been incredibly delicious. Below are some photos of my results. 

First, I tried their recipe for beef stroganoff. The sauce that accompanied this one was amazing. 


Second, I tried their Indian-inspired "Chicken Korma." Yes, it was as good as it looks!


There are lots more recipes I would like to try. The book has recipes for all sorts of things I'd never considered making in a slow cooker: hot drinks, dips, puddings, and even cheese cake!


Friday, May 17, 2013

Journey into the Art of Canning

I've been a long-time reader of Patrice Lewis's blog, and it was there that I got my first taste for canning. It looked so homey and old-fashioned. Those who mastered it could be so self-sufficient--growing their own fruits and vegetables and preserving them for years to come. I just had to try it.

So I took the plunge, and purchased the guide Patrice recommended (Putting Food By) and all of the various canning equipment.


First, I made strawberry jam.  Honestly, the first time was an incredibly exhausting amount of work. I was on my feet for hours, perspiring over the steaming pot. I'm sure any experienced canner would have laughed if they'd watched me dash back and forth from the book to the jars, as the thought of killing my loved ones through botulism loomed over my head.

In the end, despite how exhausted I was, it was worth all the work. I beheld the fruits of my labor with pride: Beautiful gleaming jars filled with yummy jam.


In the following months, I made more batches of strawberry jam until I had finally achieved a jam with a flavor and viscosity I was satisfied with. I went on to enter my local fair for the first time with this jam and received an honorable mention.

From there I continued on to variations of jams, and then whole apricots, and most recently apple pie filling. 


I'm still a novice, but I can't wait to delve further into the world of canning. Next item on my canning agenda: choosing a recipe for this year's fair.